Setting up a server
Name, icon and banner, invites, channels, emoji and stickers, welcome and onboarding, templates and more.
Open the server menu by clicking the server's name, then Server Settings. You only see the pages you have permission to change. The owner sees everything. It opens in the same window as User Settings; type in the search box at the top of the list to find a page.
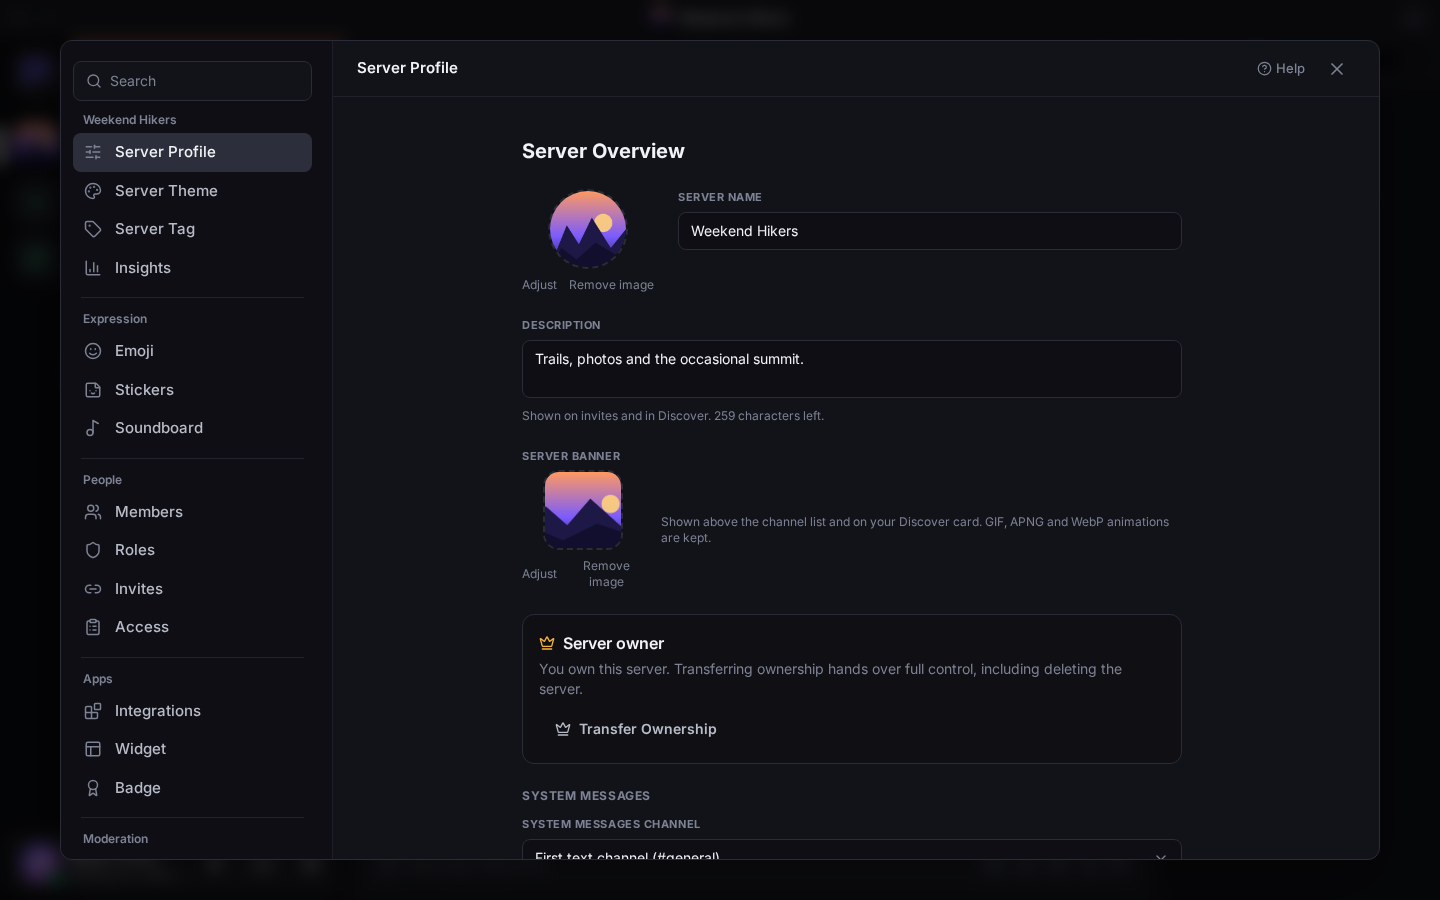
Name, icon and banner
On Server Profile:
- Icon: a square picture up to 8 MB.
- Server name: up to 100 characters. Description: up to 300.
- Server banner: the picture at the top of the channel list. It's cropped to 16:9; 1920×1080 is ideal. Animated GIF, APNG and WebP stay animated.
- System messages channel: where Parley welcomes new members. Optionally it prompts members to wave hello.
- Server rules: up to 4,000 characters. Tick Members must accept the rules before chatting to have newcomers agree first.
- Default notification settings for new members, and whether members may schedule messages.
After picking a picture, drag and zoom to frame it. To reframe it later, click Adjust.
Also here:
- Server Theme: give the server its own colours. Members can choose to see them.
- Server Tag: a short tag and badge that members can wear beside their name.
- Insights: how many people join and stay, how busy it is, and which channels are most popular.
Inviting people
Click Invite People in the server menu for a link to share. On Invites in Server Settings you can make custom invites:
- Expire after: 30 minutes up to 30 days, or never.
- Max uses: from 1 to 100, or no limit.
- Grant temporary membership: people leave automatically when they log off, unless they've been given a role.
Every active invite is listed, with Revoke to cancel one. Public servers listed in Discover can also have a custom vanity link.
Access: to approve people by hand, turn on Review new members before they can chat and write a few questions. Applications wait for you to Approve or Reject.
Channels and categories
- Create Channel is in the server menu, or click + beside a category. See Channels for the kinds.
- Drag channels and categories to reorder them.
- Right-click a channel and choose Edit Channel for:
- its topic and Slowmode
- Age-Restricted and Spoiler settings
- for voice: the user limit, video and audio quality, and end-to-end encryption
- forum Tags
- Permissions: see Roles and permissions
Emoji, stickers and sounds
| Limit | Files | |
|---|---|---|
| Emoji | 100 per server | PNG, JPEG, GIF or WebP under 512 KB. Names of 2 to 32 letters, numbers or _. |
| Stickers | 60 per server | Under 1 MB. 320×320 pixels works best. |
| Soundboard | 48 per server | MP3, OGG, WAV, WebM or M4A under 512 KB (about 5 seconds). |
Members can use your custom emoji in any server they're in.
Welcoming new members
- Welcome Screen: a greeting with up to 5 suggested channels, shown when someone joins.
- Onboarding: questions for newcomers ("What brings you here?"). Each answer can give them roles and channels, so people see what's relevant. Mark questions Required, or allow several answers.
- Rules: set on Server Profile. Members click I agree before they can post.
Communities inside your server
In a big server, group channels into communities. Each gets its own page and managers.
- Create one with + beside Communities in the channel list.
- Open its page and click Edit. You can set:
- its icon, name and description
- a web address
- an About section and Links
- who looks after it, and its channels
- Add header image gives the page a banner:
- Wide pictures of 1600 pixels or more work best.
- Click Adjust to choose Fill or Fit, line it up with the alignment grid, and zoom.
- Previews show how it looks on a phone, a laptop and a wide screen.
- Delete community is at the top of the editing bar. It deletes the community's channels and their messages too.
Getting found
- Discovery: list the server in Discover with a category, a description and a banner. An admin reviews it first.
- Widget: an embeddable box for your website, showing who's online with a Join button.
- Badge: a live "Join us" badge for a README or website.
Server templates
Server Settings → Server Template shares your server's setup (its roles, categories, channels, permissions and a few settings) so others can start a server just like it. Messages, members and emoji are never copied.
- Download template file saves the server as it is right now as a
.jsonfile. Keep it as a backup of your setup, or send it to someone. No link needed. - Share a link: give the template a title and description, then Generate Template. The link stays the same; click Sync Template after changing your server so the link gives the new setup. Delete Template turns the link off.
Anyone can create a server from a template file or link with Add a Server → Use a Template, on any Parley server. See Starting from a template.
People who open a template link see what it sets up, and can create a server from it or download it as a file.
Handing over or closing down
These are at the bottom of the list, for the owner only:
- Transfer Ownership hands the server to another member.
- Delete Server: type the server's name and your password to confirm. Changed your mind? You have 7 days to restore it from User Settings → Account.