Studio
Record, arrange and mix songs together in a Recording Studio channel, live or in your own time.
A Recording Studio channel is a music workspace inside your server. Each project is a song, with its own multitrack editor, takes, comments, versions and chat. Band members can record together live, or add parts whenever they have time.
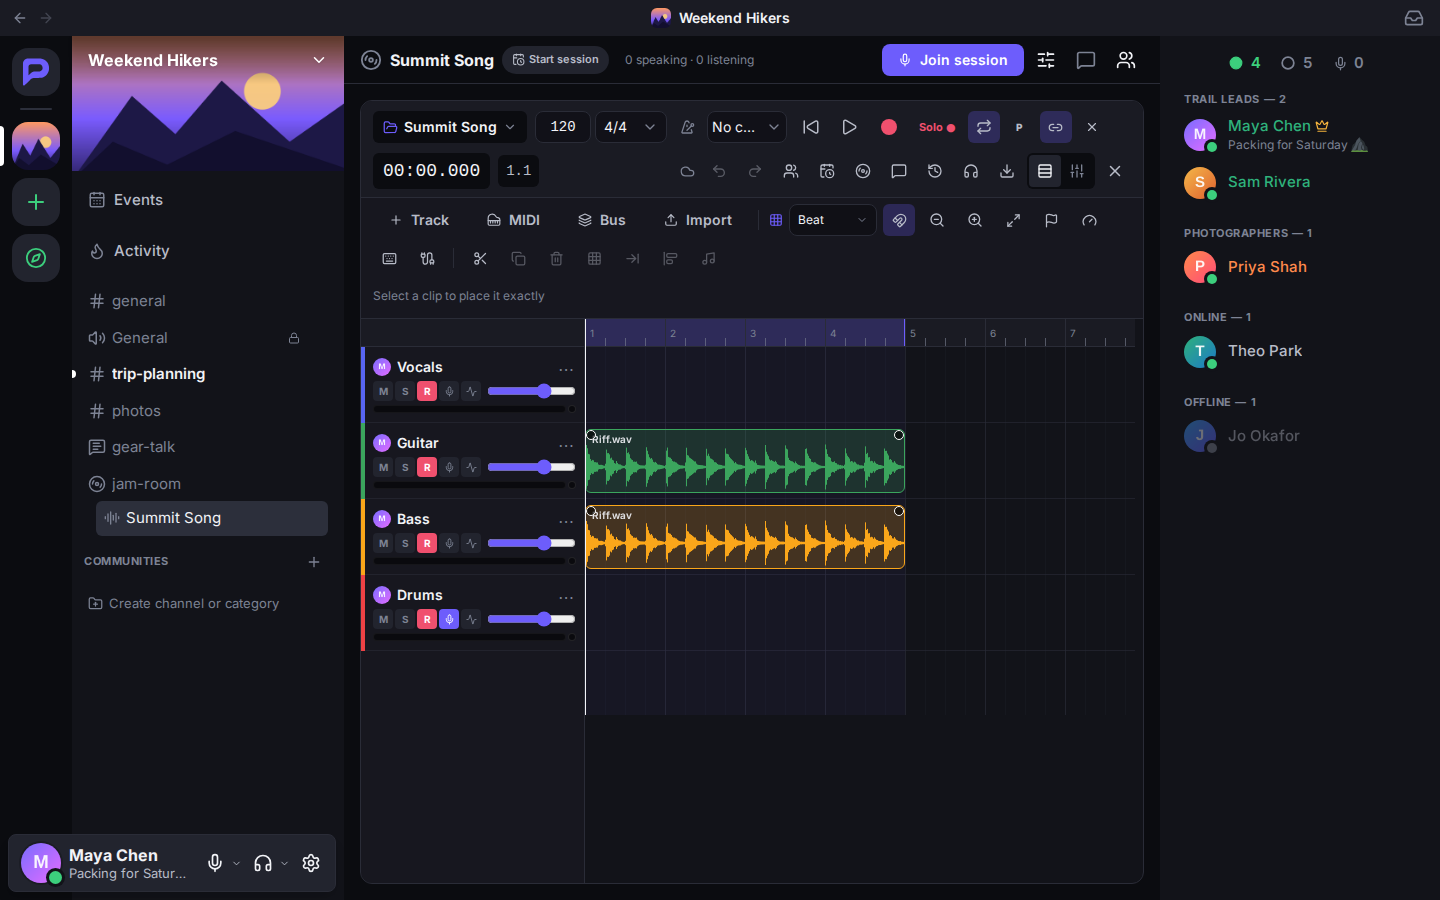
Starting a project
Open a Recording Studio channel and click New Project. Give it a name and a tempo. You need the Create Projects permission.
Already started a song somewhere else? Import opens .dawproject files from Bitwig, Studio One, Cubase and others, as well as Parley's own .parley-project files.
Recording
- Set up your audio in the Audio panel: your output, and Recording latency. Click Measure so your takes line up with the beat.
- Add a track: audio for a microphone or instrument, or MIDI with a built-in synth, drum kit or sampler.
- Arm the track and press record. Record the band records everyone in the session from the playhead; Record alone records just you. A take can be up to 30 minutes.
No MIDI keyboard? Play notes with your computer keys: A to K are the white notes, and Z and X change octave.
Arranging and editing
| Keys | Does |
|---|---|
| Space | Play or stop |
| Home | Back to the start |
| L | Loop on or off |
| S | Split the clip at the playhead |
| Ctrl+D | Duplicate |
| Q | Quantise (snap notes to the grid) |
| Ctrl+Z / Ctrl+Shift+Z | Undo / redo |
| Tab | Switch between the arrangement and the mixer |
Double-click a MIDI clip to open the piano roll. There are also a metronome and count-in, markers, tempo changes, and automation lanes for volume and effects.
In the mixer, every track has volume, pan, solo, mute, effects and sends.
Effects
Each track, bus and the master has an effects rack: EQ, filter, compressor, gate, limiter, reverb, delay, drive and chorus. Click + Effect to add one. Effects play top to bottom; hover one to move it or remove it.
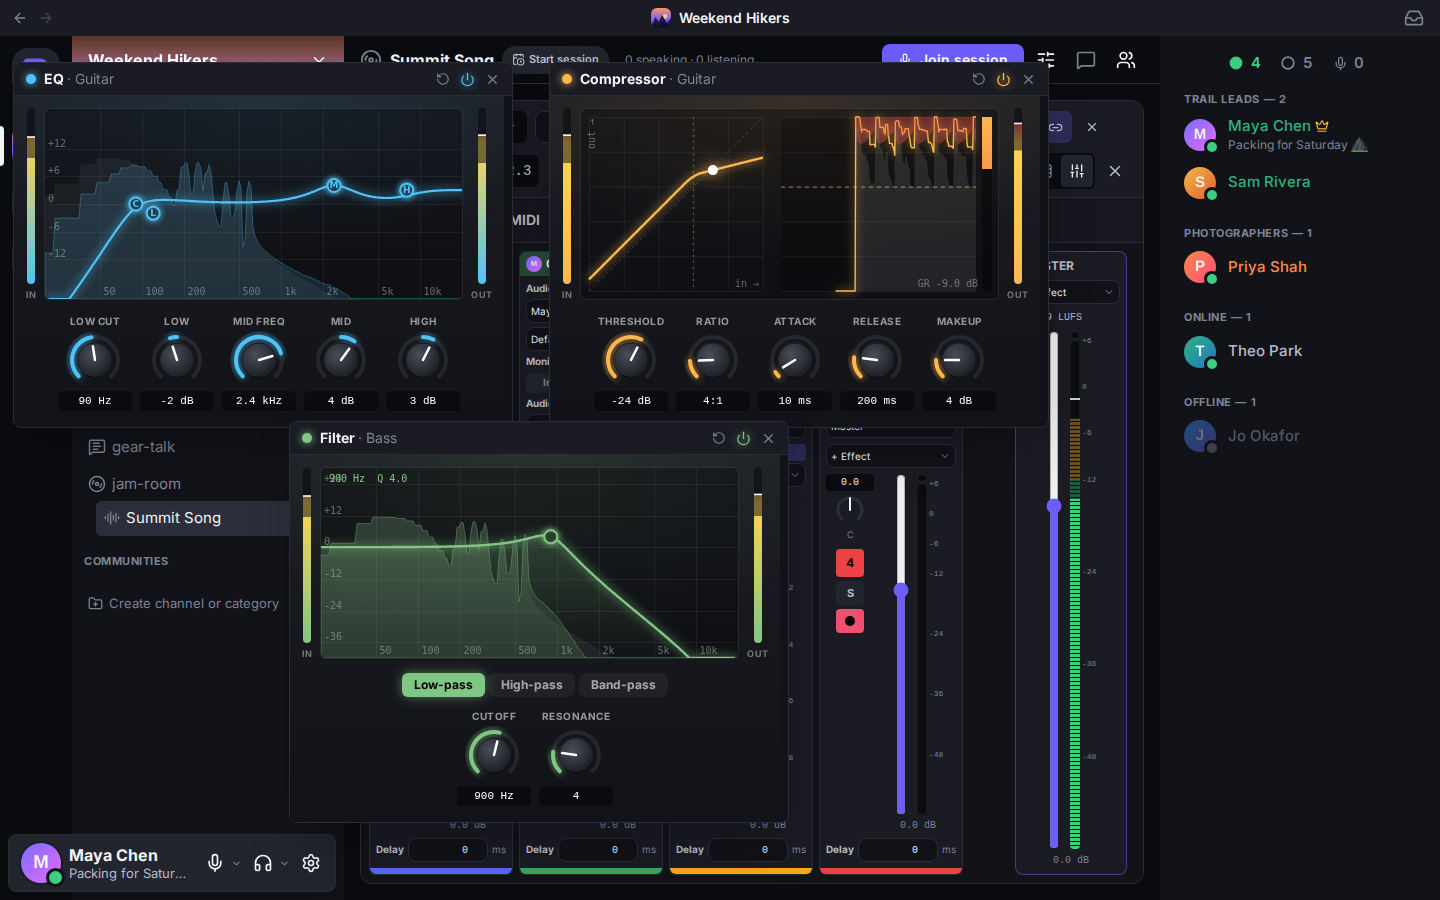
Click an effect to open its window. You can open as many windows as you like and drag them anywhere; click a window to bring it to the front. Each window shows what the effect does:
- EQ and filter: the frequency curve over the sound's spectrum. Drag the dots on the curve to shape it. On the filter, drag up or down for more or less resonance, or use the mouse wheel.
- Compressor, gate and limiter: how loud goes in versus how loud comes out, a dot showing where your sound is now, the last few seconds of level, and how much is being turned down.
- Reverb: the shape of the tail. Delay: each echo fading away. Drive: the distortion curve, with the sound before and after. Chorus: the sweep.
While the song plays, the views and the In and Out meters move with the sound.
To change a setting:
- Drag a knob up or down. Hold Shift for fine control.
- Use the mouse wheel or the arrow keys.
- Type a value under the knob, such as
2.5kor25%. - Double-click a knob to put it back to its default.
The power button in the window's title bar turns the effect off and on. The arrow resets all its settings.
Examples
These start from an effect's defaults. Play the song while you work, ideally with Loop on, so the windows show your sound.
Clean up the low end of a guitar or vocal. Add an EQ. Drag the C dot on the curve to the right until Low cut reads about 90 Hz; the rumble below it goes, and the spectrum behind the curve shows what you took away. Drag the M dot to about 2.5k and up a few dB to bring the part forward.
Even out a vocal. Add a Compressor. Set Ratio to 4:1, then turn Threshold down while you watch the dot on the curve: when the loud words cross the bend, the GR meter shows how much they are turned down. Aim for about 3 to 6 dB on the loudest words, then raise Makeup by about the same amount so the part is as loud as before.
Sweep a filter. Add a Filter to a synth or drum track and pick Low-pass. Drag the dot on the curve slowly from right to left while the song plays: the sound gets darker as the cutoff moves down. Drag the dot up or down, or scroll the mouse wheel over it, to change Resonance: more gives a sharper, ringing peak at the cutoff. To make the sweep part of the song, record it with an automation lane.
Stop a noisy track hissing between notes. Add a Gate first in the rack. Watch the lamp: it says OPEN while the part plays and CLOSED in the gaps. Raise Threshold until it closes in the gaps but stays open on the quietest notes you want to keep.
Put a part in a room. Add a Reverb and set Mix to about 20%. A longer Decay gives a bigger space; a lower Tone makes the tail darker, so it sits behind the dry sound.
Catch peaks on the whole mix. Add a Limiter to the Master and leave Ceiling at -1 dB. The window shows how often the loudest moments are held down; if it is working all the time, turn the tracks down instead.
Working as a band
- Band: everyone is an Engineer (can change anything) or an Artist (records their own parts). Protect this track stops others editing your part.
- Sessions: an engineer clicks Start session to work live together. Everyone hears what anyone plays.
- Takes: every recording is kept. Pick the best one with Use take.
- Comments: leave notes at a point in the song, like "drums drag here", and Resolve them when done.
- Versions: Save version before big changes, and Restore if you don't like where it went.
Listeners who aren't in the band can still play the song, follow along and comment.
Lost your connection? Keep working. Your changes are saved and sent when you're back online.
Working somewhere else
A project keeps playing, and a take keeps recording, when you go to a chat or another channel. While it does, a card above your name at the bottom left shows the project, whether it's Playing or Recording, and the time. It also shows while you're in the project's voice room. Its row in the channel list shows moving bars while it plays and a red dot while it records.
- Click the project's name on the card to go back to it.
- Stop or play from the card. Play carries on from where you stopped.
- Stop the take from the card, if you could stop it in the project.
- Done with it? Stop it, then click ✕ to close the card.
Sharing the result
The Export panel can:
- export the mix as WAV, FLAC or MP3
- export stems (each track separately, zipped)
- Post the mix to a channel for everyone to hear
- save the project as
.dawprojectto open in another music app